Class 3 - Tables, Game Loops
Play homework
- Pongs, by Pippin Barr
Topics
- Tables
- For-loops
- Game loop
- Basic bouncing ball
Description
This week we add on more programming fundamentals and then start to think about creating a complete game: Pong! Programming this game will challenge us to use all of our new skills. We need to create a ball, have it bounce around the screen, and take player input to move controllers. We’ll build the game one step at a time, in an iterative fashion.
Class Notes
Tables
Tables are basically lists in which we can store values.
You create a table with curly brackets ({ }):
function _init()
	fruits = {}

end
We just created a table called fruits. Now we can store values inside the table. There are multiple ways to do this.
One way is to put the values inside the curly brackets.
function _init()
-- Each value is separated by a comma, just like with parameters and arguments
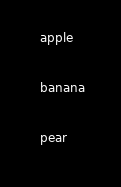
fruits = {"apple", "banana"}
end
We can also use the function add. The first argument is the table, the second argument is the value we want to store inside that table. This adds a new value onto the end of the table.
function _init()
	--Each value is separated by a comma, just like with parameters and arguments
	fruits = {"apple", "banana"}
	add(fruits, "pear")
end
So now after _init() our table will contain "apple", "banana" and "pear". To prove that, let’s put the values on screen. For that we’re going to use print(text, x, y). The optional x, y location allow us to specify where to write that text on screen.
function _draw()
	--Arguments: (text, x-position, y-position)
	print("Test", 20, 20)
end
When you run the game, you should see the text “test” written. We can access the values of our table by writing the tables name, followed by brackets ([ ]) (So not curly but square brackets!). Inside these brackets, we write the position of the value we want.

Like I said, tables are a list of values. We first added "apple" and "banana", so those are on the first and second position in the list. Next we added "pear", so that’s on the third position in the list. On position 4 there is no value (yet), since we only added 3 values.
So if we want to print "apple", we have to get the first value of the list.
function _draw()
	print(fruits[1], 20, 20)
end
And so now it should draw "apple". If you replace the [1] with [2], you should get "banana", and with [3] you get "pear".
Now we want to draw all 3 fruits. We could use print 3 times, each with a different table entry…
function _draw()
	print(fruits[1], 20, 20)
	print(fruits[2], 20, 20)
	print(fruits[3], 20, 20)
end
…but imagine if we had 100 values in our table. Luckily, there’s a solution for this: for-loops!
for-loops
A for-loop is a way to repeat a piece of code a certain amount of times.
You create a for-loop like this:
function _init()
	for i=1,10 do
		print("hello "..i)
	end
end
If you run the program you should see it prints hello 1, hello 2, hello 3, all the way to 10.
To create a for-loop, first you write for. Next you write a variable and give it a numeric value. This is where the for-loop starts. The variable can be named anything, but it’s common to use i. This variable can only be used inside the for-loop (just like with functions and parameters). Next you write the number to which it should count. So for example for i=6,18 do will start at 6 and keep looping till it’s at 18.
There is also a third, optional number. This is by how much the variable increases. for i=6,18,4 do would go: 6, 10, 14, 18. With this you can also make for-loops go backwards with -1.
Our table starts at 1 and has 3 values, so we will write:
function _init()
	fruits = {"apple", "banana"}
	add(fruits, "pear")

	for i=1,3 do
		print(fruits[i])
	end
end
When you run the program you’ll see that it prints all 3 fruits. In the first loop it prints fruits[1], then in the second loop fruits[2]and finally in the third loop fruits[3].
Editing tables
But what if we add or remove a value from a table? We would have to change the 3 into another number. For that we use #fruits. With the #-sign, we can get the length of a table. The length of a table refers to the number of things in that table. That length would be 3 in our case, since we have 3 entries: apple, banana, and pear in our fruits table.
function _init()
	fruits = {"apple", "banana"}

	print(#fruits)
	--Output: 2

	add(fruits, "pear")

	print(#fruits)
	--Output: 3
end
function _draw()
	for i=1,#fruits do
		print(fruits[i])
	end
end
Let’s use this knowledge to draw all 3 fruits.
function _draw()
	for i=1,#fruits do
		print(fruits[i], 20, 20)
	end
end
If you run the game you should see it draws all 3 fruits, except they’re all drawn on the same position. We can fix this by printing each number on a different height.
function _draw()
	for i=1,#fruits do
		print(fruits[i], 20, 20 + 8 * i)
	end
end
So now "apple" will be drawn on the y-position 20 + 8 * 1, which is 28. Then "banana" gets drawn on 36, and "pear" on 44.
If we were to add another fruit, we won’t have to change anything. It will automatically be drawn. Let’s add "pineapple".
function _init()
	fruits = {"apple", "banana"}
	add(fruits, "pear")
	add(fruits, "pineapple")
end
We can also remove values from our table. For that we use deli. You can think of this as DELete I (“index”). The first argument is the table we want to remove something from, the second argument is the position we want to remove (also called “the index”). So if we want to remove banana, we do the following:
function _init()
	fruits = {"apple", "banana"}
	add(fruits, "pear")
	add(fruits, "pineapple")
	deli(fruits, 2)
end
When you run the program you’ll see that banana is no longer drawn, and that pear and pineapple have moved up.
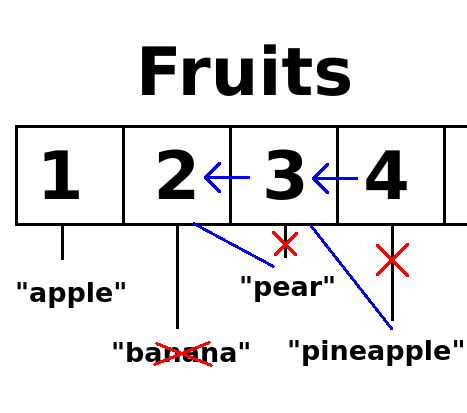
When you remove a value from a table with deli, all the following items in the table will move up. So what was on position 3 is now on position 2 in the table. And what was on position 4 is now on position 3.
You can also add or change the values inside the table directly. For example, we can change "apple" into "tomato":
function _init()
	fruits = {"apple", "banana"}
	add(fruits, "pear")
	add(fruits, "pineapple")
	deli(fruits, 2)
	--The value of position 1 in the table becomes "tomato"
	fruits[1] = "tomato"
end
ipairs
Back to the for-loops. There is actually another way, and an easier way to loop through the table. We can use an ipairs loop.
function _init()
	fruits = {"apple", "banana"}
	add(fruits, "pear")
	add(fruits, "pineapple")
	deli(fruits, 2)
	fruits[1] = "tomato"

	for i,v in ipairs(fruits) do
		print(i..v)
	end
	--Output:
	--1tomato
	--2pear
	--3pineapple
end
This for-loop loops, or what we also call iterates, through all the values in the table. The variables i tells us the position of the table, v is the value of that position in the table. It’s basically a shorthand for fruits[i]. For example, in the first iteration the values for the variables i would be 1 and v would be "apple". In the second iteration, i and v would be 2 and "pear" respectively.
But how does it work? Why does the function ipairs allow for this? That is for another time. For now all you need to know is that ipairs is basically a shorthand for the following:
for i=1, #fruits do
	v = fruits[i]
end
Let’s use ipairs for drawing our tables.
function _draw()
	-- i and v are variables, so we can name them whatever we want
	for i,frt in ipairs(fruits) do
		print(frt, 20, 20 + 8 * i)
	end
end
Summary
Tables are lists in which we can store values. We store these values when creating the table, with add, or with table_name[1] = "some_value". We can get the length of the table with #table_name. With for-loops we can repeat a piece of code a number of times. We can also use for-loops to iterate through tables.
What is a game loop?
-
A game, fundamentally, is an infinite loop. During every iteration of that loop, we’re repeatedly performing the following set of steps:
- First, we’re processing input. That is to say, we’re constantly checking: has the user pressed a key on the keyboard, moved the joystick, moved/clicked the mouse, etc.?
- Second, we need to respond to that input from the previous step by updating anything in the game that depends on that input (i.e., tracking movement, detecting collisions, etc.).
- Third, we need to re-render anything that was updated in the previous step, so that the user can see visually on the screen that the game has changed and feel a sense of interactivity.
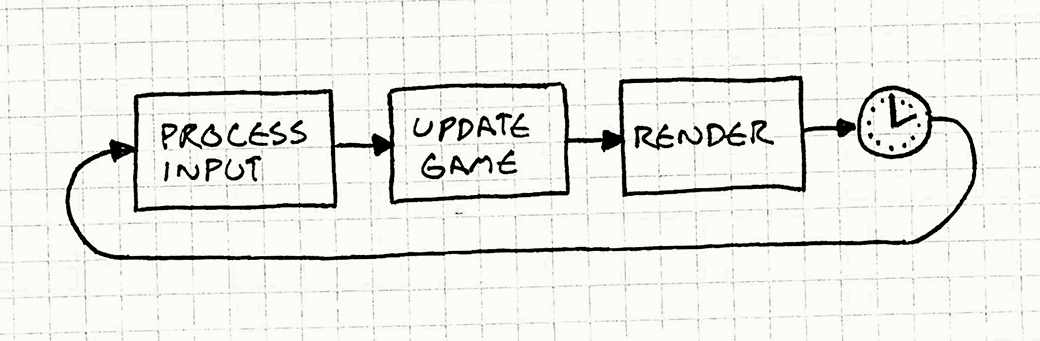
Photo taken from gameprogrammingpatterns.com/game-loop.html, where you can read more about game loops.
2D Coordinate System
-
In the context of 2D games, the most fundamental way of looking at the world is by using the 2D coordinate system.
-
Slightly different from the traditional coordinate system you might’ve used in math class, the 2D coordinate system we’re referring to here is a system in which objects have an X and Y coordinate (X, Y) and are drawn accordingly, with (0,0) being the top-left of the system. This means positive directions moving down and to the right, while negative directions move up and to the left.
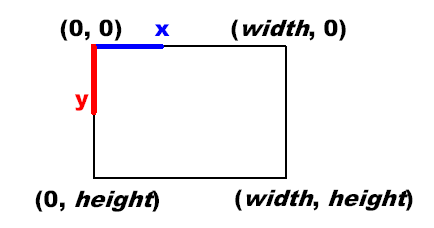
Photo taken from rbwhitaker.wdfiles.com/local--files/monogame-introduction-to-2d-graphics/2DCoordinateSystem.png.
Game scope
- We are aiming to recreate “Pong,” a simple 2 player game in which one player has a paddle on the left side of the screen, the other player has a paddle on the right side of the screen, and the first player to score 10 times on their opponent wins. A player scores by getting the ball past the opponent’s paddle and into their “goal” (i.e., the edge of the screen).

Workshop: Follow the bouncing ball
Procedure
- Add a ball to the screen with x and y values
- Give the ball an x-speed and y-speed
- If the ball hits a wall, bounce it
How to bounce?
First of all, how do we move the ball?
We previously moved a sprite or shape on the screen to the right by adding 1 to its x coordinate. We can do the same to its y coordinate. to have it move at a diagonal.
function _init()
  x=0
  y=0
end

function _update()
  x=x+1
  y=y+1
end

function _draw()
  cls()

  --a rectangle is drawn from its top left point to its bottom right
  rect(x,y,x+20,y+20)
end
What happens when we remove the cls() command from _draw()? Why?
Try changing our rectangle to a circle. Try having our x and y change by different amounts in the _update(). What happens? Why?
function _update()
  x=x+1
  y=y+3
end
function _draw()
  cls()

  circ(x,y,8)
end
Finally, we need to keep the ball on the screen through a “bounce.” To do that, we need to detect when it goes off screen first. We have a tool that we can make use of.
For example, to detect if the ball has gone off screen to the right, we can check to see if its x coordinate is greater than the max width of the screen. Here’s how to have the ball wrap around the screen
function _update()
  if x>126 then
    x=0
  end
end
That is fine for some games, but in Pong it’s important to have the ball be able to bounce. To do that, we will add in a variable to hold a value for the change in x and a value for the change in y each time the ball moves. We will call this xspeed and yspeed.
function _init()
  x=0
  y=0
  xspeed=1
  yspeed=2
end
function _update()
  x=x+xspeed
  y=y+yspeed
end

function _draw()
  cls()
  circ(x,y,8)
end
And then we can add in detection in the _update() to change our xspeed if we go too far to the right:
if x>126 then
  xspeed=xspeed*-1
end
This is the equivalent of x=x-1 in our above code, which would move the ball to the left.
Challenge:
Alter our code so the ball bounces on all 4 sides.
Reading, playing, writing homework
- Read game designer Pippin Barr’s chapter 2 Rules: Change Comes From Within, in his book The Stuff Games Are Made Of (CC BY NC ND), published by MIT Press.
- Play Pippin Barr’s Pongs (in the web browser)
- Write a list of 5-10 Pong variations off the top of your head (smart, stupid and in-between). They should be new ideas, not from Pippin. Include a one sentence description for each.
Code homework
In class we began to create a bouncing ball in code. The ball should begin with a random xspeed and random yspeed. To complete this coding assignment:
when the ball bounces against a wall:
- change the color of the ball to a random color
- change the size of the ball to a random reasonable size (Let’s say within the range of 5 - 15)
- play a sound effect
when you press O:
- put the ball somewhere new
Optional challenge
When you press X:
- change ball to sprite
- and when you press x again: change it back to a ball
Optional challenge SPOILERS (copy and paste the text to see):
- Lookup the difference between btn and btnp.
- Consider how a boolean variable may help you turn something off and on.
Credits
- Copyright (c) 2022 Sheepolution
- Pong 0: MIT Open Courseware Colton Ogden & David J. Malan 2018
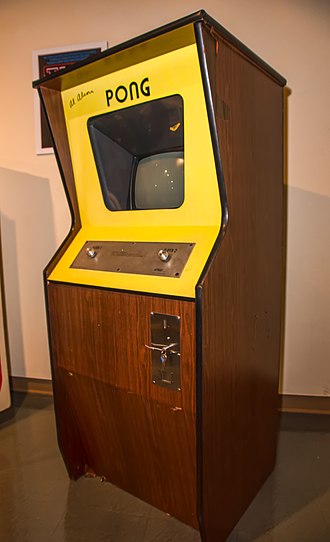
- Pong cabinet photo by Chris Rand
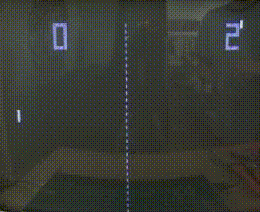
- pong74ls test, CC BY 3.0
- The Stuff Games Are Made Of by Pippin Barr 2023, MIT Press CC BY-NC-ND