Class 12 - State Machines, and Distribution
Play homework
- Doodle Jump by Lima Sky (Igor and Marko Pušenjak)
- Canabalt by Adam Saltsman
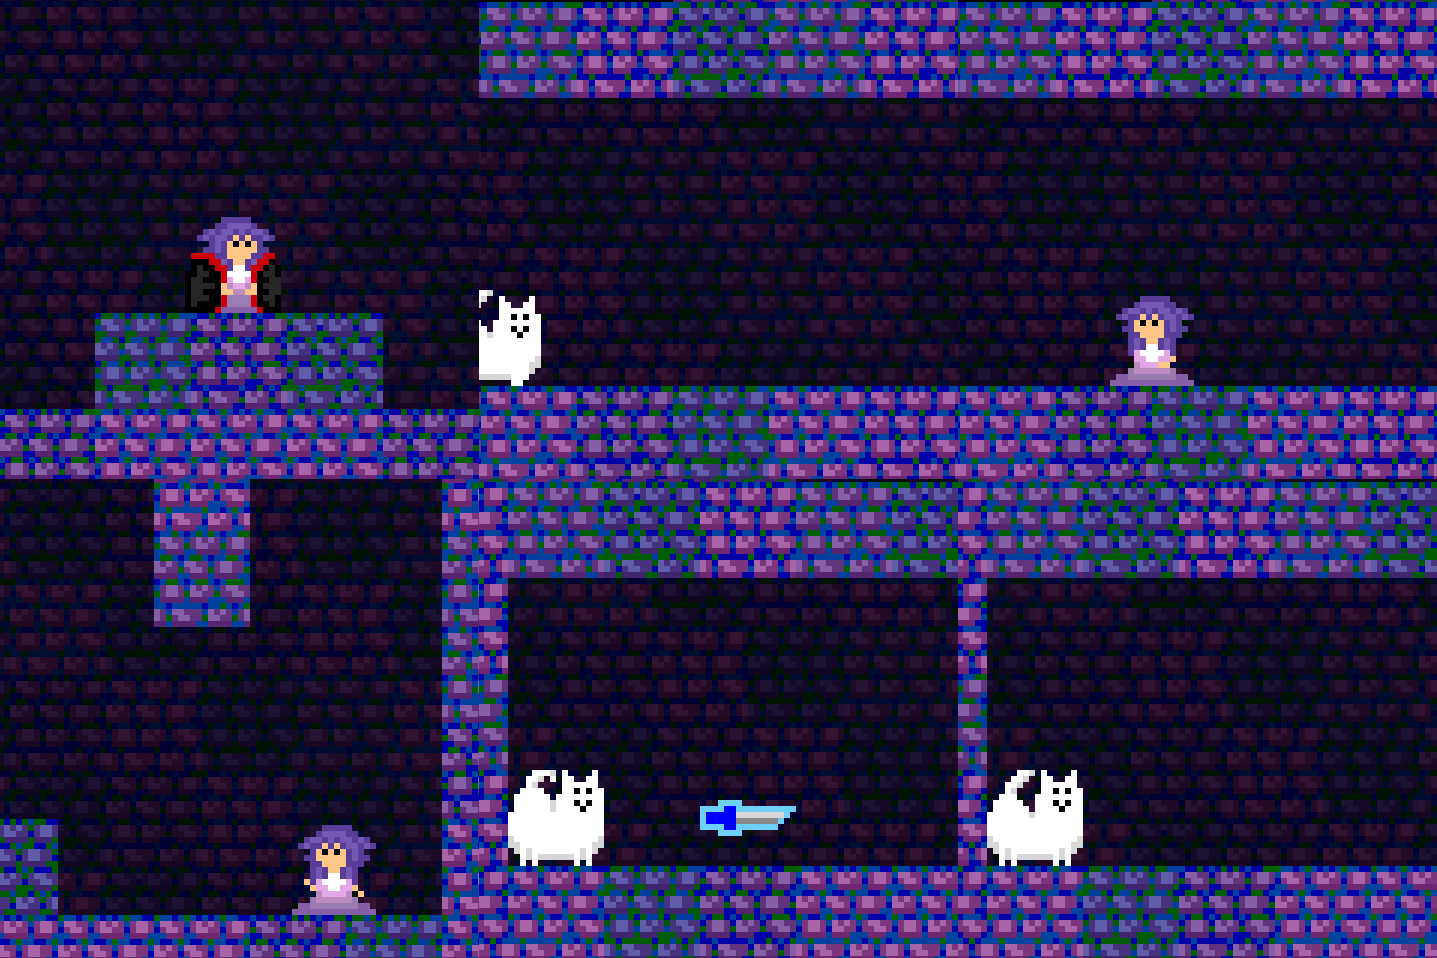
- These Out Of Control Booty Shaking Kittens Are Ruining My Castlevania™! by Sylvie (check out their other games)
Topics
- Level Design
- Finite State Machines
- Handling states
- Distributing games
Description
This week we’ll learn how to structure and handle creating a complex games with various scenes a player can encounter. We also cover game distribution. Then work on playtesting.
Class notes
Level Design
Finite State Machine Concept
A finite-state machine (FSM) or finite-state automaton (FSA, plural: automata), finite automaton, or simply a state machine, is a mathematical model of computation. It is an abstract “machine” that can be in exactly one of a finite number of states at any given time. The FSM can change from one state to another in response to some inputs; the change from one state to another is called a transition. An FSM is defined by a list of its states, its initial state, and the inputs that trigger each transition.
The behavior of state machines can be observed in many devices in modern society that perform a predetermined sequence of actions depending on a sequence of events with which they are presented. Simple examples are: vending machines, which dispense products when the proper combination of coins is deposited; elevators, whose sequence of stops is determined by the floors requested by riders; traffic lights, which change sequence when cars are waiting; combination locks, which require the input of a sequence of numbers in the proper order.
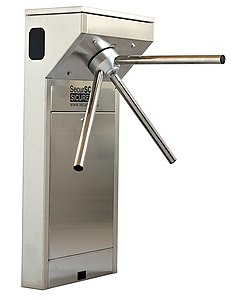
An example of a simple mechanism that can be modeled by a state machine is a turnstile. A turnstile, used to control access to subways and amusement park rides, is a gate with three rotating arms at waist height, one across the entryway. Initially the arms are locked, blocking the entry, preventing patrons from passing through. Depositing a coin or token in a slot on the turnstile unlocks the arms, allowing a single customer to push through. After the customer passes through, the arms are locked again until another coin is inserted.
Considered as a state machine, the turnstile has two possible states: Locked and Unlocked. There are two possible inputs that affect its state: putting a coin in the slot (coin) and pushing the arm (push). In the locked state, pushing on the arm has no effect; no matter how many times the input push is given, it stays in the locked state. Putting a coin in – that is, giving the machine a coin input – shifts the state from Locked to Unlocked. In the unlocked state, putting additional coins in has no effect; that is, giving additional coin inputs does not change the state. However, a customer pushing through the arms, giving a push input, shifts the state back to Locked.
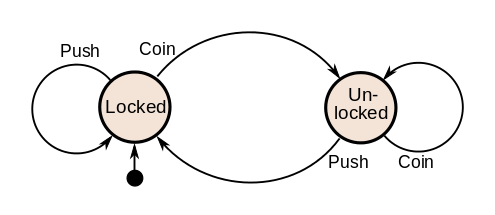
The turnstile state machine can also be represented by a directed graph called a state diagram (above). Each state is represented by a node (circle). Edges (arrows) show the transitions from one state to another. Each arrow is labeled with the input that triggers that transition. An input that doesn’t cause a change of state (such as a coin input in the Unlocked state) is represented by a circular arrow returning to the original state. The arrow into the Locked node from the black dot indicates it is the initial state.
Title Screen or Menu
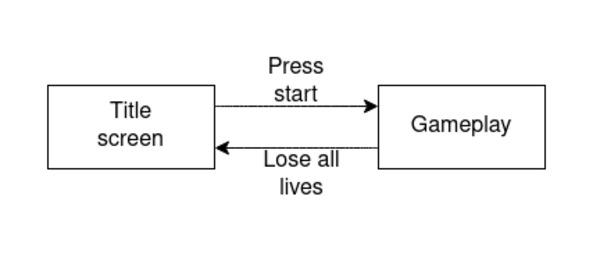
Initializing
The love.load() happens once at the state. We set the game state to the initial state.
function love.load()
  state=="title-screen"
end
Update
The love.update() is where gameplay elements are changed (like a timer).
The update checks which state we are in and runs the correct update code depending on that state.
function love.update()
  if state=="title-screen" then
    update_title_screen()
  elseif state=="gameplay" then
    update_gameplay()
  end
end
Drawing
The function love.draw() is called to draw things to the screen. There’s some repetition in this one. Compare to our love.update() function above.
function love.draw()
  if state=="title-screen" then
    draw_title_screen()
  elseif state=="gameplay" then
    draw_gameplay()
  end
end
The rest of our update code, and changing states
In our 2 state diagram from above, translated to code below:
To change states:
- In our keypressed function (which runs every time a key is pressed), we check if we are in the title-screen state. If we are and the player has pressed return then we change to the gameplay state.
- In our gameplay update function, if the player’s lives are less than 1, change state back to title-screen.
function love.keypressed(key, scancode, isrepeat)
  if state=="title-screen" then
    if key == "return" then
      state=="gameplay"
    end
  end
end

function update_title_screen()
  --title screen update code
end

function update_gameplay()
  --gameplay update code
  --move enemies (change their x,y positions)
  --move player based on key presses
  if player.lives<1 then
    state=="title-screen"
  end
end
More states
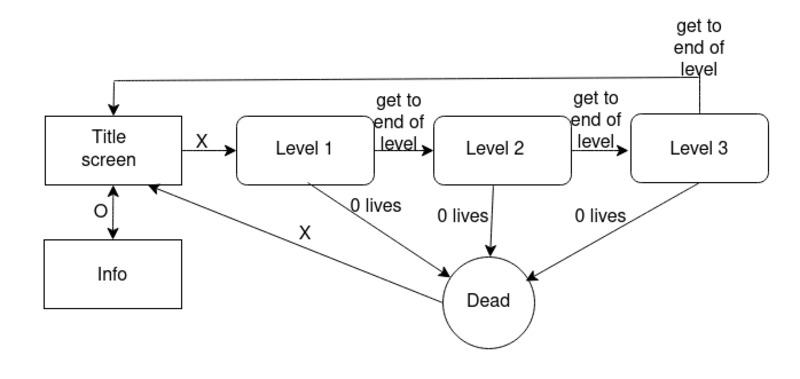
You can add more states to your game. It pays to draw a diagram first and then to turn that into code.
Below is an example update function checking for variosu states:
function love.update()
    if state=="animation" then
	  update_anim()
    elseif state=="startscreen" then
	  update_startscreen()
    elseif state=="info" then
	  update_startscreen()
    elseif state=="dead" then
	  update_dead()
    else
	  update_game()
    end
end
Inside each of these update functions you would be checking for various events to occur (pressing a button to start, losing all lives, etc) and then changing the state based on the event.
The updates are paired with related functions called in love.draw().
function love.draw()
    if state=="animation" then
	  draw_anim()
    elseif state=="startscreen" then
	  draw_startscreen()
    elseif state=="info" then
	  draw_howtoplay()
    elseif state=="dead" then
	  draw_dead()
    else
	  draw_game()
    end
end
Distributing your game
You made a game, and you want to share it with others. You could make them install LÖVE on their computer, but that is not necessary.
First, we need to change the title and icon. For that we will use a config file.
Create a new file called conf.lua, and put in the following code
function love.conf(t)
	t.window.title = "Panda Shooter!"
	t.window.icon = "panda.png"
end
Save the file. Now when you run the game you’ll see the game has the title “Panda Shooter!”, and that the icon is the panda.
This is what the config file is for. LÖVE loads conf.lua before it starts the game and applies the configurations. For a full list of options check out the wiki.
Now that our game has the correct title and icon, let’s turn it into an executable.
First we need to package our game in a zip file. Go to the folder of your game, select all the files. Now right click, go to Send to and click on Compressed (zipped) folder. The filename is not important, but we need to change the extension to .love (by default .zip).
Note: This part is Windows only. Go here to get info on building your game for other platforms.

If you can’t see file extensions
Press Windows + pause/break. In the upper-left corner of the new opened window click on Control Panel. Now go to Appearance and Personalization.

Click on File Explorer options.
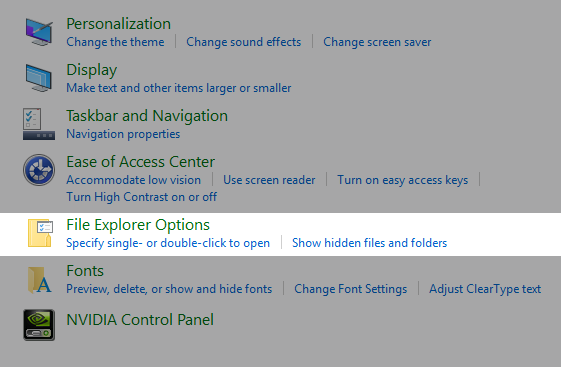
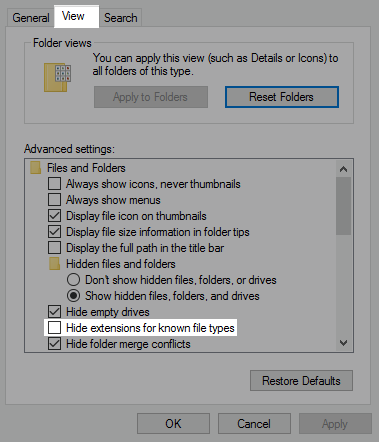
A new window opens. Click on the tab View. In Advanced options, make sure that Hide extension for known filetypes is unchecked.
I wrote a bat file that packages the game for you. Download this zip file, and unzip all the files in a folder.
Now move your .love file on top of build.bat. This creates a .zip file in the same folder. This is the file that you will want to share with people. They have to extract all the files in a folder and open the .exe file.
Now you need to find a place to share your game. Check out itch.io.
For more information on building your game, check out the LÖVE wiki page for it. It also tells you how to build your game for other platforms.
Summary
With conf.lua you can configure things about your game like title and icon. Select all the files in the folder of your game, put them in a zip. Change the file’s extension from .zip to .love. Download this zip file, and unzip all the files in a folder. Move your .love on top of build.bat to create a .zip. People will have to unzip all the files in a folder and open the .exe to play your game. We can also use Castle which is a client that allows us to share our LÖVE games.
Code homework
Complete your platformer
Credits
- Finite state machine graphs by Lee Tusman CC BY-NC
- Finite State Machine description from Wikipedia, CC BY-SA
- Distribution section copyright (c) 2022 Sheepolution
- gif from These Out of Control Booty Shaking Kittens Are Ruining my Castlevania! by Sylvie
