Class 3 - From Input to Output
Today: keyboard input, navigating via command line, and connecting to an external monitor via GPIO pins
Schedule:
- running the Pi from the CLI
- alternative shells
- desktop managers
- addings an alternative monitor via GPIO pins
- Group studio work
What is the command line?
The command-line interface, sometimes referred to as the CLI, is a tool into which you can type text commands to perform specific tasks—in contrast to the mouse’s pointing and clicking on menus and buttons. Since you can directly control the computer by typing, many tasks can be performed more quickly, and some tasks can be automated with special commands that loop through and perform the same action on many files—saving you, potentially, loads of time in the process.
The application or user interface that accepts your typed responses and displays the data on the screen is called a shell, and there are many different varieties that you can choose from, but the most common these days is the Bash shell, which is the default on Linux and Mac systems in the Terminal application.
The philosophy behind the command line
The command line is the place where you type commands to manipulate files on your computer or launch programs that perform tasks. In some ways the command prompt is the simplest kind of computer interface possible. It is likely that you are more familiar with interfaces that have windows and buttons, but the command prompt is an interface entirely driven by text input. As mentioned earlier, Linux was originally an open source clone of Unix. In Unix (and Linux), programs are intended to be minimal, modular, “do one thing well”, be clear, transparent, and extendable.
How to Access the Command Line on a Mac
On a Mac you access the Terminal application, located inside the Utilities folder inside the Applications folder on your hard drive. You can also access the terminal from Spotlight, which looks like a magnifying glass in the top right of your menu bar. Once you have the basics down, you may wish to download iTerm a free replacement Terminal for Mac with nice color and style options and multi-screen support.
Accessing the Command Line on a PC
PC’s come with a default Powershell, but it is not a Linux-style shell. In other words, the programs and tools for working on the command line in this intro will not work in Powershell. As of the time of writing (Spring 2018), I recommend downloading the free terminal program Cmder for a Linux-style shell on PC, including the underlying Git-Bash and Linux for Windows. You may also wish to read about Windows Subsytem for Linux.
Your file system
Understanding what folder you are located in is important when working on the command line.
The home folder is the default location that you start in when you open the terminal. When you are moving around the computer in your file system with the Terminal, you specify the name of the folder you want to move into or work in. Linux allows you to specify a full path or a relative location. Think of the full path as a specific address, like 500 Main Street, New York, NY 11101. A relative path is exactly what it sounds like. To use our street metaphor, a relative path would sound something like 2 blocks west and 1 block north of where you’re currently located. In other words, the location specified by the relative path changes based on where you are currently located. If you’re at your house and follow the directions specified by the relative path, you’ll wind up in a very different location than if you were at your work address and then followed the directions of the relative path.
This is an important concept because you always have a choice of what path you write when working on the command line. You can specify an exact location or a relative location. When you don’t specify a path, the terminal assumes the location is the directory you are currently inside.
Sometimes in online tutorials you’ll see something that looks like this: path/to/file. You will never actually type path/to. It simply is trying to indicate that you’ll need to replace it with the proper location on your own computer. The Mac Terminal has a cool feature to make this easier for beginners. You can drag a file or folder onto the terminal and it will fill out the exact path.
Your basic terminal commands
Most Bash commands and programs have a built-in manual page. You can access it by typing man before the program you want to run. There’s even a manual for the manual. You can access it by running man man.
Print Working Directory, pwd
Use this command to remind you what folder you’re currently located in. As you move around files or move between directories it’s easy to get lost. pwd will remind you exactly where you are.
List Files, ls
ls is the list function. It lists all of the files in a directory, including text files, images, audio and sub-folders, among other files.
ls just outputs the content of your folder in a mass.
ls -1 lists files alphabetically, each file or folder on its own line to make it easier to read.
ls -a will list all files including hidden files in the folder.
Change Directory, cd
cd stands for change directory and is the workhorse function to let you navigate around the computer. A directory is a folder. .. stands for the larger umbrella directory that holds the directory you are currently inside of. If you type cd .. it will take you back to one directory broader than the one you are currently located in. The tilde character ~ stands for your home directory.
Examples
cd directoryName to move into the directory titled directoryName currently sitting inside the directory you are presently located in. If you type the folderName incorrectly or it doesn’t exist then you’ll get an error message telling you that the folder doesn’t exist.
cd .. will take you to the larger directory that holds the directory you are currently located in. If you were in the directory refrigerator and then you made a folder inside that called drawer, maybe you have gone into that drawer with cd drawer to see its contents. If you cd .. then you will leave and go back into the directory called refrigerator from before.
cd will take you to your home folder, no matter where you were before.
cd ~ does the same as above, taking you to your home folder.
cd ~/Desktop/junk will take you to a folder called junk located on the Desktop folder, which is sitting inside your home folder on your hard drive. Remember that the tilde means your home folder. junk is a directory I made on my computer but Desktop is already a directory built-in to OS X.
Copy a file, cp
The command cp is used to duplicate a file, in whatever format it’s already in. You specify the file you want to copy, and then give a name for what you want your copy to be called.
Example
cp fileYouWantToDuplicate nameForTheDuplicateFile
Move a file (and/or rename a file), mv
The command mv works almost exactly the same as cp but instead of copying it moves the location of a file. You specify the file you want to move, and then give the path where you want to move it. If you specify a different name, the file’s contents will remain the same but the filename will change. You could even use this, for example, to just change the filename but keep it in the same folder it’s located in. Note: It’s important to be mindful of what folder you are located in.
Example
mv fileYouWantToMove path/to/directoryWhereYouWantToMoveIt will move a file inside your current directory to a different specified folder.
mv fileName newFileName will keep the file inside your folder but rename it.
Remove a file or directory, rm and rmdir
Want to get rid of a file? You could drag it to the trash, or you could use the remove command. One thing to note is that by default, using rm does not check in with you to confirm you really do want to eliminate the file. To remove a directory, you must use rm -d or rmdir. By default, you cannot delete a directory if it is not empty. You must first delete the individual files inside that directory.
Examples
rm filename to delete a file in your current directory.
rmdir folderName to delete a specified directory inside your current dir
Clear your screen, clear
When you need a refresh and want to clear all of your previous commands and output from your field of view, run clear. It doesn’t delete your history (see history below for more info on this), but it does help declutter your screen.
clear
Read a file
There are a variety of ways to access and read text in a file on the command line. The simplest is to use cat which stands for concatenate. You specify the file and it dumps the text onto the command line and exits. If you’re trying to read a text file and it’s too large to fit in a single screen of the terminal you will probably prefer to use less. less is a reader program that lets you move back and forth in a text file. You can move forward a screen at a time by hitting the space bar or scroll down or up with the arrow keys. There are a variety of other options that you can read about if you run man less. When you get to the end of the file, press q to exit back onto the command line.
Example
cat filename.txt
less fileName.txt
History and Command Completion, ↑ and Tab ↹
To repeat a terminal command you typed previously press the up key and it will recall the last command you typed in. If you press up again, it will recall the line you typed prior to that. And repeatedly pressing up will move further back in time. You can move back and forth in your history with the up and down arrow keys.
Another timesaver is using the tab key. If you type the first few letters of a filename or directory and press tab the command line will attempt to fill out the rest of the file or directory name. If there are multiple files with the same root, it will complete the part of the name that they share. You can then add more letters and try hitting tab to see if it will complete the file name.
Cancelling
Cancel is Control-C.
If you are typing a command and realize you don’t want it anymore, type Control-C and it will be deleted.
Similarly, if you are running a program and want to quit out of it, you can usually do so with Control-C once or several times in a row.
Resources
The Terminal tutorial.
Linux For Makers book
An illustrated shell commands tutorial
Alternative shell
Zsh is a shell designed for interactive use, although it is also a powerful scripting language. Many of the useful features of bash, ksh, and tcsh were incorporated into zsh; many original features were added.
fish is a smart and user-friendly command line shell for Linux, macOS, and the rest of the family.
Aliases, Desktop Icons
bash Aliases
fish Functions
Tiny monitors via GPIO pins
GPIO stands for General Purpose Input Output.
an uncommitted digital signal pin on an integrated circuit or electronic circuit (e.g. MCUs/MPUs) board which may be used as an input or output, or both, and is controllable by software. –from Wikipedia, the free encyclopedia

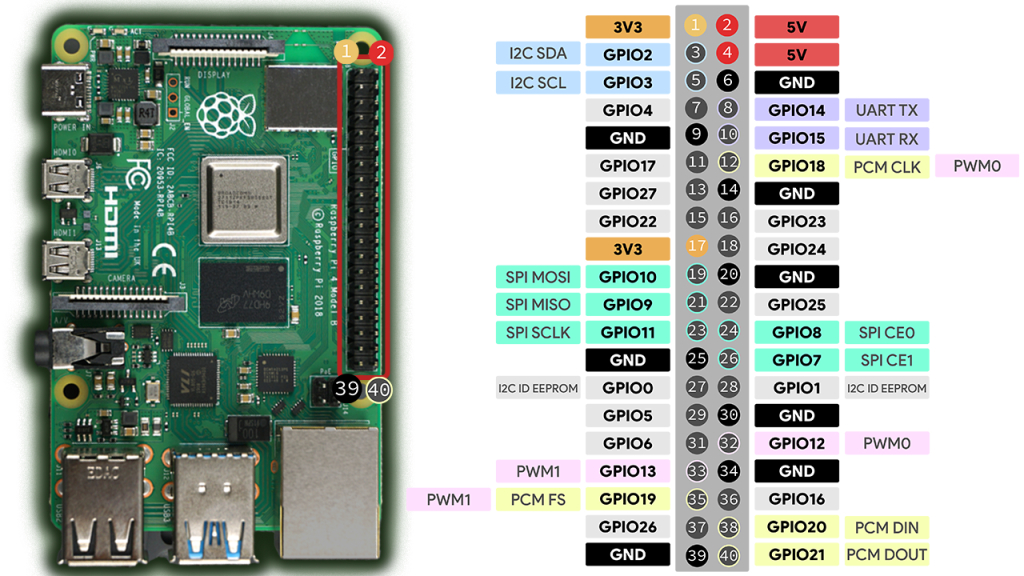
Image from Raspberry Pi tips
Things to know about GPIO pins:
- They are by default “unused” but you can define their use via software/code you write
- You use them to connect with external circuitry. Think of your Pi as the “core” and the GPIO lets you add on additional hardware to unlock (screens, sensors, motors, and other hardware devices)
- You can read or write to pins, usually sending a “high” or “low signal” (think of this as a binary signal like on or off)
- Pins can be enabled or disabled
- A “hat” is a hardware board designed to (mostly) easily connect and sit on top of your Raspberry Pi to connect to the GPIO pins and add additional functionality. A hat is intended to make things easier so you don’t have to hand solder and connect wires yourself. Because Raspberry Pi is open source, there are many different manufacturers that make HATs.
- You usually write a script that you run from the command line to work with the GPIO pins. Often, this could be in Python (and there is lots of documentation for Python on Pi), but it could be other languages (C, Lua, Scratch, Node.js) as well.
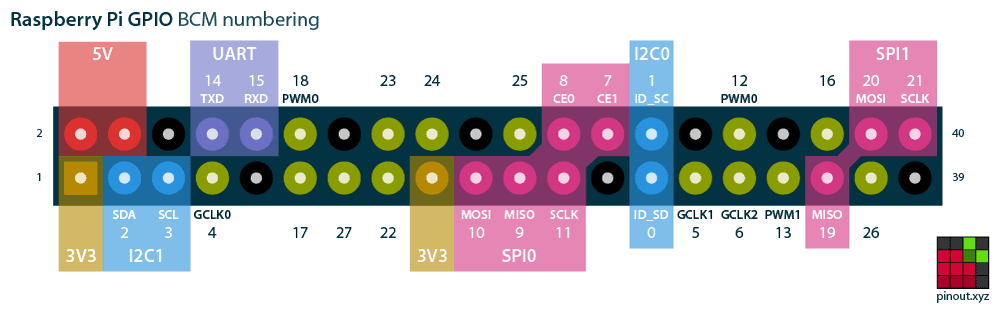
Pin out mapping, image from Raspberry Pi tips
Each pin on your Pi may have different functionality. Consult a pin out graphic to look them up. “Hats” are designed to more easily connect to these pins correctly, but they need to be aligned in the correct direction.
Always connect your Hats or to any pins with the power off!
Working with GPIO pins
Let’s update our Pi and our software.
sudo apt update
sudo apt upgrade
Let’s install the GPIO library in case it’s not already installed.
sudo apt install python3-rpi.gpio
Let’s enable the GPIO pins on our Pi
sudo raspi-config
Then go to “Interface Options” and enable “I2C” and SPI” in the sub-menus. These are for specific pins.
Resources:
- Getting Started with GPIO Pins on Raspberry Pi (Beginners guide)
- Raspberry Pi Pinout
- Hundreds of example “hats” to connect to the Pi
Adafruit DPI TFT Kippah for Raspberry Pi
For example, this looked useful.
Group work session
- Review your mood boards
- Review your sketches
- Talk about your concepts
- Refine your ideas and decide your concept
- What parts are needed? Review and build list. Where will you get needed items?
- What costumes? What technical needs?
Requirements: a final version of the cyberpunk project will be due on Feb 27.
- a cyberdeck, with name, customized OS/desktop, and installed software
- at least one costumed character
- produced images showing your character(s) with the cyberdeck
- A printed user guide to the cyberdeck (more details on the user guide requirements forthcoming)
Consider how you’ll build the visual iconography and interface for your cyberdeck, inspired by the cyberpunk aesthetics and scenes we’ve viewed, or something new that you conceive of. Your cyberdeck should complement your character (and vice versa).
At minimum, the cyberdeck should have:
- a logo or video (or animated gif) that should run on startup
- a custom startup sound that plays on startup
- a selected or produced background that fits the concept
- customized terminal software and prompt
Homework
- Group image board
- Group concept description
- Group costume plan
- Group sketch (costume(s) + cyberdeck)
- Group equipment list
- A working system with custom startup sound, desktop background, terminal shell, and a different desktop environment (if you end up using the default, describe what it is and why you are using it :)