Week 13 - 3D space
Today
- Computational Art project review
- Random Walk
- 3d space: Coordinates and Transformations
- Lights, Camera, Materials
- Final project guidelines / work
Review computational art projects
Critique
Random Walk site
3d Space
Coordinates and Transformations
WebGL stands for Web Graphics Library, and is a standard in JavaScript for 2D and 3D interactive graphics. p5.js includes a number of p5.js functions for working in 3d space through WebGL.
Let’s start by setting up p5.js to use WebGL, by passing WEBGL as a third parameter into createCanvas().
function setup() {
  createCanvas(windowWidth, windowHeight, WEBGL);
}
function draw() {
  background(255);
  fill(200, 0, 200);
  box();
}
Maybe you don’t see anything special yet. Why not?
3D coordinate space
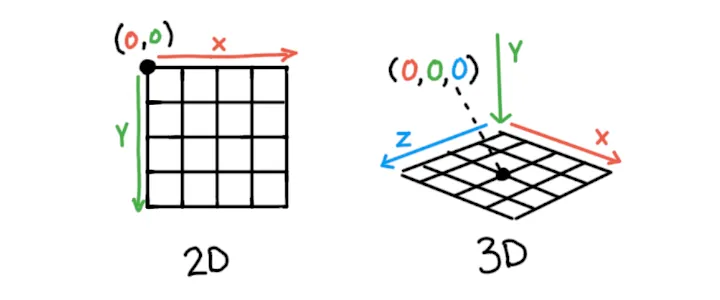
2D sketches use the x- and y-axes to define horizontal and vertical positions. 3D sketches extend this model with a z-axis which defines depth. When drawing in 2D, the point (0,0) is located at the top left corner of the screen. In WebGL mode, the origin of the sketch (0,0,0) is located in the middle of the screen. By default, the x-axis goes left to right, the y-axis goes up to down, and the z-axis goes from further to closer, “out of” the screen.

You can call debugMode() in your setup() function to add a grid on the x- and z-axes and the red-green-blue x, y, and z arrows to your sketch, similar to the illustration above.
Transformations: Position and Size of 3D Shapes
p5.js has a few functions that we can use to position and orient objects within 3D space: translate(), rotate(), and scale(). Collectively these are known as the transformation of an object. These methods are available for both 2D and 3D drawing.
translate() moves the origin to a given point. Anything drawn after we call translate() will be positioned relative to that point. translate() accepts arguments for x, y, and z values.
// draw a box 100 units to the right
translate(100,0,0);
box();
Try this!
A random walk involves moving in a random direction each step. Try doing a random walk in 3D using translate(), drawing a cube after each step like a trail of breadcrumbs!
rotate(): Orienting Objects in Space
rotate() reorients whatever is drawn after it.
There are a few functions that can be used to rotate an object in 3D. Most of the time, it’s easiest to call functions like rotateX(), rotateY(), and rotateZ(), which each allow for rotation around a specific axis. Each function accepts a single argument specifying the angle of rotation.
// rotate X, Y, and Z axes by 45 degrees
rotateX(QUARTER_PI);
rotateY(QUARTER_PI);
rotateZ(QUARTER_PI);
box();
By default, p5.js expects angles to be in radians. Radians use numbers from 0 to TWO_PI to specify an angle. To use degrees, either convert degrees to radians using radians(numberInDegrees) or use angleMode(DEGREES):
// rotate each axis by 45 degrees
rotateX(radians(45));
box();
// or
angleMode(DEGREES);
rotateY(45);
box();
scale() changes the size of whatever is drawn after it. Like the other functions described, it accepts arguments for x, y, and z values.
Transforming Multiple Shapes
Transform functions are cumulative and affect everything drawn after them. For example, if you call translate(50, 0, 0) twice, they add together, making it equivalent to calling translate(100, 0, 0) once. However, sometimes you will want to draw different shapes with different transformations.
The push() function saves the current transformations and style settings. Then, after performing new transformations, the pop() function is used to restore us to the original transformations. The result is that whatever transformations or styling changes that are made between push() and pop() are isolated to that portion of the code. In the example below, we draw a number of boxes at their own distinct locations by placing their transforms between push() and pop():
function setup() {
  createCanvas(200, 200, WEBGL);
}
function draw() {
  background(220);
  noStroke();
  lights();
  orbitControl();

  push();
  translate(-50, 0, -100);
  fill('red');
  sphere(50);
  pop();

  push();
  translate(0, -100, -300);
  fill('green');
  sphere(50);
  pop();

  push();
  translate(25, 25, 50);
  fill('blue');
  sphere(50);
  pop();
}
The Order of Transformations Matters!
The way transformations affect each other can feel unpredictable at first because order matters. Each transformation always affects the next one. For example, if rotate() is called, followed by translate(), the direction of that translation will be affected by the rotation. The entire coordinate system is rotating and moving, not just the shape itself. Here are some recipes for different transformation orders that you can use.
The Default: Positioning Objects in a Scene
If you are drawing many objects, chances are that each one will have a unique position, orientation, and scale. For this, you should first translate() to the center of where the object should be, then rotate() to match its orientation, and finally scale() to fit its size. This is a good order to use by default.
Drawing with Symmetry
Sometimes you want to draw the same thing multiple times with mirror or radial symmetry. In these cases, you will end up drawing in a loop. For each iteration, rotate() or scale() depending on the type of symmetry you want. Finally, apply any other transformations needed to draw your shape.
In the example below, scale(-1, 1) is used to add horizontal symmetry to draw the eyes and ears of a face:
function setup() {
  createCanvas(200, 200, WEBGL);
}

function draw() {
  background(255);
  lights();
  noStroke();
  orbitControl();

  // The head
  push();
  scale(1, 1.25, 1);
  sphere(50);
  pop();

  // The nose
  push()
  translate(0, 0, 50);
  scale(1, 1.5, 1);
  sphere(10);
  pop()

  // Draw symmetrical parts by looping over each
  // side, represented by the horizontal scale applied.
  for (let side of [-1, 1]) {
    push();
    // Apply the symmetrical transformation
    scale(side, 1, 1);

    // Eyes
    push();
    translate(20, -10, 40);
    sphere(8);
    pop();

    // Ears
    push();
    translate(50, 0, 0);
    scale(1, 1, 0.3);
    sphere(20);
    pop();

    pop();
  }
}
Try this!
Try giving a body with arms and legs to the head in the example!
Lights, Camera, Materials
Creating in 3D is about more than just geometry. Cameras, lights, and materials are important parts of creating a visually interesting 3D scene. p5.js has a number of tools that make it possible to transform the appearance of our geometry.
Camera and view
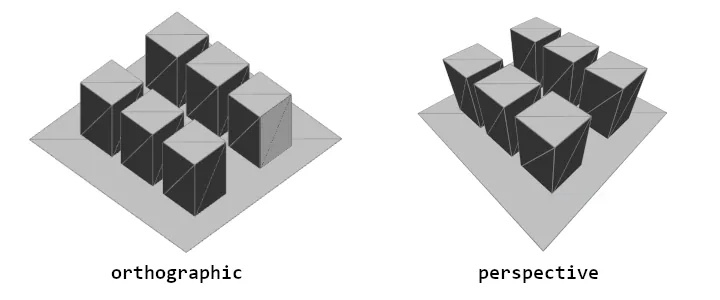
The camera is an essential piece of a 3D scene. It gives us a sense of space and dimension and helps us frame our content. WebGL mode provides a perspective camera by default, but we can change this using the perspective() or ortho() functions.

A perspective camera skews objects so that they appear smaller as they get further away, vanishing at a single point in the distance. This is in contrast to an orthographic camera, where the geometry stays the same size as it gets further away and has no vanishing point.
Field-of-view, or FOV, is the term used to describe how much our camera can see, measured in angle. In simple examples, it might appear to have a zoom-like effect, but larger FOV angles cause shapes to have more perspective distortion. Sometimes, this effect is used for artistic purposes.
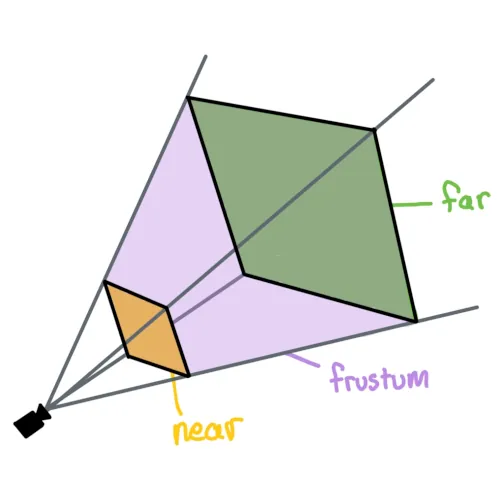
Another important term to understand when working with cameras in 3D is the camera frustum. The frustum of the camera is the shape of the camera’s view. It is a pyramid-like shape within which geometry will be displayed. The frustum includes two components, a near plane and a far plane. The near plane defines the minimum distance that geometry must be from the camera to be rendered. The far plane defines the maximum distance that the geometry can be from the camera and still be seen. Each of these can be changed to affect how close and how far the camera can see. This process of selectively including geometry is sometimes referred to as “clipping.” You can set these using perspective() like so:
perspective(
  fieldOfViewY, // Angle, in radians
  aspectRatio, // width / height
  nearPlaneDistance, // Minimum distance from camera
  farPlaneDistance // Maximum distance from camera
);

You can move cameras by passing arguments to camera(), but constantly moving and adjusting the camera in code can be tedious. orbitControl() can be used to zoom, pan, and position the camera using the mouse. You can use it by calling it at the beginning your draw() function, outside of any push() and pop() calls:
function setup() {
  createCanvas(200, 200, WEBGL);
  debugMode();
}
function draw() {
  background(220);

  orbitControl();
  box(50);
}
Lighting
Light is another essential part of a 3D scene, helping convey shape and depth. p5.js has a few different types of light that can be used in a sketch:
- ambientLight(): Ambient light makes everything display a little brighter, with no consideration for light position or direction.
- directionalLight(): A directional light is a light without a position that shines from a single angle, which can be especially useful for communicating depth in a scene, or when a scene needs a ‘sun’ light. This function accepts color and direction arguments.
- pointLight(): A point light emits light from a single point in all directions, similar to a lightbulb. This function accepts color and position arguments.
- spotLight(): A spot light emits light from a single point in a single direction. This light is cast in a conical shape and its radius and concentration can be adjusted.
- imageLight(): Using an image as a light source is like placing your scene inside a huge sphere textured with that image, sending light into the scene.
- noLights(): Makes it so that all subsequently drawn geometry is rendered without any lighting. This can be useful when you want flat, unshaded geometry.
These lights should be used within draw(). One image light and up to 5 lights of each other kind can be used simultaneously per shape drawn, allowing you to compose a scene with varied and complex lighting sources. You can also contain light functions within push() and pop() to contain lights to just one section of code, allowing you to use a different set of lights for another shape. Since lighting is done per shape, each object in a scene will not cast shadows on other objects.
function setup() {
  createCanvas(200, 200, WEBGL);
  camera(0,-80, 800);
}
function draw() {
  background(220);
  orbitControl()

  // use comments to enable / disable lights

  ambientLight(20);

  pointLight(
    255, 0, 0, // color
    40, -40, 0 // position
  );

  directionalLight(
    0,255,0, // color
    1, 1, 0  // direction
  );

  let locX = (mouseX - width/2) * 2;
  let locY = (mouseY - height/2) * 2;
  spotLight(
    100, 100, 255, // color
    locX, locY, 200, // position
    -locX, -locY, -200, // direction
    PI/3 // radius of the spotlight cone
  );

  // noLights();

  rotateY(millis() * 0.001);
  box();
}
Resources:
- WebGL Geometries
- Materials and Textures in Lights, Camera, Materials
Credits
Coordinates and Transformations, and Lights, Camera, Material modules by Dave Pagurek, Austin Lee Slominski, Adam Ferriss. CC BY-NC-SA 4.0
Final Project
For this assignment, you are to write up a one paragraph proposal. You are welcome to also include screenshots, links to past projects or projects that inspire you. I will give you feedback and approve projects. –Lee
Our assignments so far have been fairly restrictive. For your final project, I want to open up the field for you to create an artwork of your choice. The project should use skills and tools we developed this semester. You don’t need to use p5.js if there is another library or language that you prefer.
Final Project and presentations/critiques due during finals week.
So far in this course we have covered:
- variables
- arrays
- the debugging process
- functions
- classes and objects
- loops
- conditionals
- working with the web as platform
- history of artists working with programming and creating their own tools
- history of procedural and algorithmic art
- how math and computation can be used in the creation of works of art and design
- cultural, political and social issues inherent in computation and addressed in the work of new media artists
Consider these elements in the creation of your own work for the final project.
Works to examine
The following projects were created with p5.js.
Check out the online exhibit of works in the p5.js showcase:
ALL OF THE PROJECTS IN THE p5.js SHOWCASE
Some additional projects:
Protest Korpe by Friends of Asya Tulesova (Aisha, Kuat, Irina and Jeff), to create banner images that can be shared on social media
PROTEST KORPE is inspired by quraq körpe, a type of Kazakh quilt. Like a quraq körpe, civic activism and protection of our rights depend on the voices and contributions of each of us. In this work, each square on our “collective quilt” is important to sew a new Kazakh reality. We want: a fair trial for Asya Tulesova, police that do not resort to violence, and just laws which respect peaceful assembly. #JusticeForAsya
Room Me by Kat Zhang
An interactive visual essay/game that explores self-isolation and self-care during quarantine.
Cyber Flowers by JPL
With simple and repeated revolving, I created a new form of text art that I’d like to call Cyberflowers - made of digital typography and grew from the digital texts in the cyberspace. Here you can see how individual letters gradually break their shape-based meaning and become blooming cyberflowers while the curves and lines become cyber-petals and cyber-stamens.
Soundings - Loren Britton and Romi Ron Morrison, a browser extension and sound art piece that interacts with your browser
Here we recite selections of poems some by Black Feminist poets & scholars: Audre Lorde and Alexis Pauline Gumbs, and invite you to read some lines from Claudia Rankine. We will invite you to consider how fully you can feel in your daily doings, how the erotic is a well of everyday affirmation….
Suburbia Life by David Schnitman
suburbia.life is a procedurally generated suburban neighborhood created with p5.js. The sketch features roads, houses, trees and clouds as seen from a bird.
Optional Theme
You are welcome to propose your own conceptual idea.
Optionally, here is a theme you are welcome to use:
Hide part of the world
If you adopt this theme as a prompt, you are welcome to interpret this in whichever way you see fit.
Your final project should have a separate document with the following info
- Final Project title
- approximately half page summary of project consisting of 1. conceptual idea and 2. technical detail
- What was your approach or strategy did you take in creating your project?
- What frameworks, libraries, did you use, if any?
- What other artists, projects or artworks did you research that led to the creation of this work?
- Include at least 2 screenshots of your project running.
Your code should:
- be clear and organized
- use comments and modular functions to make your code clear and easy to follow
- work without bugs
- work properly in fullscreen
Your final project should:
- Create a compelling interactive visual artwork synthesizing both concept and technical execution
- Properly cite any code that you found and used online
- Be based on your own aesthetic and conceptual interests
- Go beyond the basics of primitive shapes and colors to a well-executed personal artistic vision